 Spanish
  French
  German
  Italian
  Portuguese
  Russian
  Chinese
  Japanese
  Korean
  Arabic
 How to Use the FSI Drills for Maximum Gain
FSI language drills - they're not fun, nor sexy, but they work! The FSI learning drills, how to use and get the most out of them.
How to Use the FSI Drills for Maximum Gain

To learn a language, you need a combination of input and practice. Some self-study courses like Assimil give you plenty of input but little opportunity to practice. Others may provide more exercises, but nowhere near enough to achieve fluency.
This is where FSI courses have a big advantage. A major part of the FSI methodology is drills, and since the courses are so extensive, they provide lots of opportunities for practice.
However, the FSI materials were designed to be used with a teacher, so to make the most of them, you need to know how to adapt them to your needs.
Some of the drills are intuitive and can be used as they are, but others are more difficult to adapt.
To help, here are my tips and advice for making the most of FSI drills.
Why are drills important?
If you’ve ever lived in a foreign country, you’ll know that certain conversations come up again and again to the point of boredom.
Where are you from? What are you doing here? Are you here for work or study? Your Portuguese is so good, where did you learn?
These are things you hear every time you meet a new person, and you soon get fed up with repeating the same answers.
However, after having the same conversation multiple times, you can quickly rattle off the standard responses without even thinking.
Through being asked the same questions and giving the same stock answers each time, without realizing, you are drilling these situations until they became second nature.
And when we learn a language, that’s exactly what we want to happen.
Tongue twisters
When speaking a foreign language, it’s one thing to know how to say something – but it’s something else to be able to produce the sentence automatically as required.
In theory, you might know how to explain why you are in the country, but the first time somebody asks, you will find yourself stuttering and searching for your words.
In a way, it’s a bit like saying a tongue twister. Try this one:
A Proper Copper Coffee Pot
The first time you try to say it, you’ll probably find you mangle the words horribly. You know what you want to say – and you can see the words right there on the page – but you just can’t get them out.
This is what it’s like when you try to speak a language without practicing. You know the words, but you can’t say them.
Now practice saying the tongue twister a few times, starting slowly and then increasing the speed. You will find it becomes easier and easier until soon, you can say it lots of times quickly without making any mistakes.
This is exactly what happens when you answer the same questions over and over – you become used to forming the sounds, and before long, you can say the words without any difficulty.
Thinking in a foreign language
When you repeat those same sentences in a foreign language, another important process is also happening.
At first, you might find you have to think of each word in English before you say it, but after having the same conversation enough times, you stop thinking in English and speak directly in the other language.
This needs to happen because you can never become fluent if you always have to translate.
If you are fortunate enough to be living in a foreign country while learning the language, this process is happening naturally each time you meet someone new or every time you take a taxi.
But if you aren’t in that kind of environment, you need to recreate the process artificially – so how do you do it?
That’s right. Drills.
How were drills used in the FSI classroom?
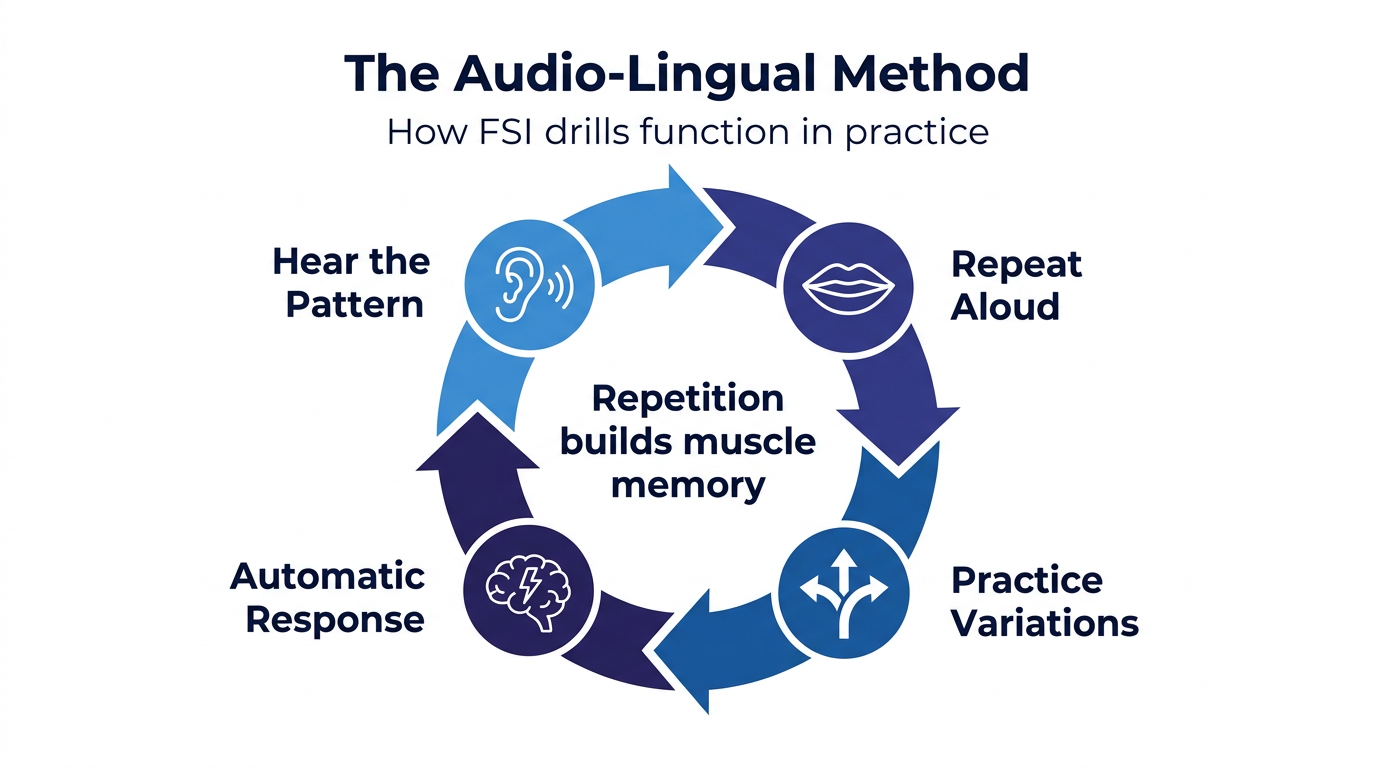
Drills were are a major part of FSI courses, and FSI students spent many hours a day practicing them.
FSI Basic courses, for example, were designed for classes of up to six students. They attended six hours of class per day with a native-speaking instructor, and during those classes, much of the time was spent doing drills
The new language for each unit was presented in the form of a dialog to be learned by heart, and this was then reinforced by drilling.
The instructor gave the cue for each drill, and the students provided the response.
The drills were repeated until they were mastered and the students could reproduce the answers automatically without thinking.
The drills were not designed to catch the students out and they were not supposed to be difficult. The sole aim was for the students to be able to produce the correct answer without thinking, without becoming tongue-tied and without garbling the words.
Importantly, the drills were led by the instructor, who could vary them within the scope of the lesson.
So how can you use the drills?
This means there’s an obvious problem for anyone wanting to use FSI materials for self-study since you don’t have an instructor to give you the cues.
For some drills, the audio recordings can replace the instructor, but for others, with no instructor, there’s no obvious way to complete the drill.
This leaves you with two choices. Either you can skip the drill and move onto the next one – or you can get creative and come up with ways of providing your own FSI-style environment.
Recreating an FSI classroom
The key to making the most of many of the drills is considering how they were originally supposed to be used.
As I mentioned, a class could have up to six students, and they would all know each other’s names, allowing for simple drills like this:
Teacher: Is that Dave?
Student: No, that’s John.
However, if you are studying alone, even a simple interaction like this is impossible. Furthermore, there’s no instructor to add variation.
This means you need to recreate some classmates and think of ways to generate the random variation the instructor would normally add.
Prepare your props
My recommendation is to create your own personal FSI classroom using props.
Specifically, I recommend you prepare the following:
- Photos of 12 people
- Two six-sided dice
- A coin
- Scrap paper cut into passport-photo sized squares
First, you are going to use the photos of the people to represent your “classmates”. Although an FSI class had only six students, having 12 photos available will give you greater scope for variation.
Since your classmates would have names, I recommend you use photos of people familiar to you – they could be family members, friends, celebrities or whoever else you want in your class.
Ideally, they should be about the size of a passport photo, which will allow you to arrange them on your desk.
If you’re serious about studying FSI materials long-term, you could consider printing them out and even laminating them since you will be using them often.
The two dice and the coin will be used for generating randomness when required, and the scrap paper will be used when exercises require you to refer to other items – in which case, you can draw them.
It’s better to draw objects rather than writing the word in English because this will allow you to associate the object directly with the word in the target language rather than associating it with the English word and then translating.
Using these basic props, you will be able to adapt many of the drills you would otherwise have to skip. However, this list isn’t exhaustive, and if you think of any other ways of adapting the drills, don’t hesitate to try.
Adapting the drills
Although the FSI courses all follow the same basic methodology, they were created by different people, sometimes decades apart, and there is significant variation between them.
In the Korean Basic course, there are five types of drill: “substitution drills”, “transformation drills”, “response drills”, “combination drills” and “expansion drills”.
However, other courses use drills with different names and different formats.
Additionally, even within the category of “transformation drills”, for example, one drill might be quite different from the next.
For this reason, I can’t give you a blueprint to follow that will tell you how to adapt every drill in every course.
Rather, I will give you some examples of the kinds of techniques you can try.
Then, using your initiative and the props I have suggested – along with any other props you think might help – you can adapt any of the drills to make them useful.
When doing this, the key is understanding the purpose of each drill, understanding what you are expected to do and then coming up with ways of replicating this for autonomous study.
You won’t always need to use props, but approach each drill with the intention of making it as useful and beneficial as possible.
Now let’s look at four of the most common drills to think about how best to tackle them.
- Response drills
You will find many types of response drills in FSI courses; they are designed to elicit specific responses, hence the name. However, often, they rely on the instructor, so you will need to learn to adapt them.
Example A
A very simple response drill could be like this:
Teacher: Who’s that?
Student: That’s Dave
Teacher: Who’s this?
Student: This is Helen
Here, the instructor leads the drill by pointing at a student and asking the question. The variables are the names of the students and choosing either “this” or “that”.
However, for drills like this, often there is no recording, making it impossible to do it without an instructor.
This is where you need to use your props to recreate the classroom, and you will need to take the role of both teacher and student.
Here’s how you can do it:
Take six of your photos and place them on the table in front of you in two rows, three at the top and three at the bottom. Then, on squares of scrap paper, write the numbers 1-6 and place a number next to each photo.
Next, roll a die. The numbers on the die correspond with the numbers next to the photos on your desk. The top row (since they are further away) corresponds with “that”, while the bottom row (since they are closer to you) corresponds with “this”.
Imagine you roll a one, the top-left photo. First, take the part of the teacher and ask, “who’s that?” – “that” because the top row is furthest away.
Next, you look at the photo and, taking the role of the student, answer, “that’s Helen”.
Once you have set up the exercise, you can repeat until you have mastered both the question and the response.
If you prefer, you can use all 12 photos and both dice for more variation.
Example B
A more complex response drill might be designed to practice these sentences:
Teacher: Whose is this/that book/pen/pencil?
Student: It’s Jim’s/Helen’s/his/hers/mine
This exercise has more variables, so it will be a bit more complicated to set up, but there are still ways you can do it.
For example, arrange your rows of numbered photos as before, but then also lay out numbered objects on your desk (either real objects or pictures drawn on scrap paper). You can use six or 12 photos and objects, as you prefer.
To generate the question, roll the dice. If the number indicates an item that is “far”, you can say, for example, “whose is that pen?”.
You then roll the dice again, and this time, the number corresponds with a person, eliciting the response, “it’s Jim’s”.
However, in this exercise, you also need to practice the response “it’s his”, and there are two ways you can do this.
After rolling the dice to choose the person, you could also flip a coin. If it’s heads, you say “Jim’s”, but if it’s tails, you say “his”.
Alternatively, instead of flipping a coin, for each one you could just repeat the question and answer sequence twice, like this:
Teacher: Whose pen is this?
Student: It’s Jim’s.
Teacher: Whose pen is this?
Student: It’s his.
It doesn’t matter how you decide to do it. The important thing is to understand the purpose of the exercise and to do it enough times to ensure you can give both the question and the answer automatically and without hesitating.
If you only repeat two or three times, you’re missing the point of the exercise.
- Expansion drills
Expansion drills are simple drills where you build up a sentence by adding extra words each time. For example:
Whose?
Whose book?
Whose book is that?
Although they can be more complex than this, these drills are easy to understand and can usually be done without adaptation simply by repeating after the cues from the recording.
However, this is also a useful technique you can apply whenever repeating a sentence you find difficult. Start with one word, then add more one at a time, repeating out loud until you can say the whole sentence easily.
Also, remember that when doing this kind of drill, the idea is to achieve fluency, not simply to go through it quickly and then move on.
This means you should repeat the drill until you can say each sentence confidently without stuttering or pausing.
- Substitution drills
Substitution drills are easy to understand, and in general, they can be done using the audio as a guide with no further adaptation.
Often, they take the form of a sequence of sentences and cues, and the student needs to change the sentence according to the cue, like this:
Sentence 1: Whose book is this?
Cue: pen
Sentence 2: Whose pen is this?
Cue: that
Sentence 3: Whose pen is that?
Cue: chair
Sentence 3: Whose chair is that?
Of course, substitution drills come in many forms, but usually, it’s obvious what is required, and you can use them to work on building your fluency while practicing manipulating the language.
- Transformation drills
With transformation drills, you are usually given a sentence that needs to be changed according to a set pattern, like this:
Sentence: Which one is called Mr. Brown?
Transformation: Mr. Brown, which one is he?
Sentence: Which one is your friend?
Transformation: Your friend, which one is he?
These exercises are usually easy to understand – although sometimes it might take you a moment to work out how the pattern should go.
They are a good way to practice manipulating language, allowing you to adapt the structures and vocabulary you learn to different situations rather than just parroting a single sentence that you have learned by heart.
Final advice
So we’ve looked at the reasons for spending time on drills, and I’ve given you a few tips for how to make the most of them. In this post, I’ve looked at just four types of drills, but the same principles apply to any others you meet.
To finish, I’d just like to add a few final words of advice.
- Study for mastery, not completion
I’ve touched on this already, but it’s worth making it explicit here. Many people tend to focus on the completion of exercises rather than mastery.
This means they rush through as quickly as possible so they can move on to the next exercise, perhaps unconsciously believing that finishing the book equals learning the language.
However, with any language exercises, whether it’s answering questions in a grammar book or doing these drills, you don’t win any prizes for finishing quickly.
The purpose is to master the language, not to finish the book, so learn to be honest with yourself and don’t move on to the next drill until you have mastered it.
- Go back and repeat
We acquire language through repetition, so don’t be afraid to go back and cover the same material several times.
If you do some drills today, repeat them next week – and then the week after.
This way, you will gain the maximum benefit from them, you will significantly improve your fluency and you will be able to produce the language automatically and without thinking.
- Do the drills out loud
One of the most important parts of doing drills is saying the words out loud at a normal volume. Don’t do them in your head, don’t whisper under your breath and don’t mutter them to yourself.
Remember our tongue twister – you won’t learn to say it quickly and confidently if you just think about it in your head.
Not fashionable – but they still have a place
Drills like this have fallen out of fashion in recent years, but they still have a place in language learning. Like any other technique, drills alone will not allow you to learn a language. But by incorporating them into your overall learning strategy, they can play an important role in developing fluency, pronunciation, and automatism in your chosen language.
Ready to Start Your Language Journey?
Whether you're looking for an easier language to start with or ready to tackle a challenge, FSI courses provide comprehensive training used by diplomatic professionals. Get complete access to textbooks, audio lessons, and practice materials.
305+
Language Courses
1000+
Hours of Audio
100%
Complete Materials